Friday, May 24, 2024

Easy Wins You're Missing in Basic Website Optimization

Search Engine Optimization (SEO) can feel overwhelming, but there are often simple improvements you might be neglecting. This blog post explores three "easy wins" that can significantly boost your website's ranking.

1. Leverage Alt Image Text

  • What it is: Alt image text is a brief description embedded behind an image. It originally served as an accessibility tool for visually impaired users.
  • Why it matters: Search engines crawl your website's code, including alt image text. Including relevant keywords here helps search engines understand your images and improves your ranking for those keywords.
  • How to do it: Briefly describe the image content and incorporate relevant keywords naturally. For example, if you're a Chicago plumber with an image of a plumber fixing a toilet, your alt text could be "Plumber fixing a toilet in Chicago."

2. Create More Specific Pages

  • The problem: Generic service pages group various services under one roof.
  • The solution: Break down your services into individual pages targeting specific keyword clusters.
  • The benefit:
    • Each page becomes more relevant to specific search terms.
    • You can target a wider range of keywords with dedicated pages.
    • It allows you to build backlinks to these more targeted pages.
  • Example: A plumber can have separate pages for toilet repair, sink repair, septic repair, etc., instead of a single "Plumbing Services" page.

3. Implement Internal Linking

  • What it is: Linking to relevant pages within your website.
  • The benefit:
    • Improves user experience by making navigation easier.
    • Signals to search engines the relationships between your pages and their content.
  • How to do it: Link to relevant pages within your website content. For instance, an e-commerce shoe store could link a blue shoe to its brown counterpart with text like "See this shoe in blue."

Bonus Tip: Optimize Once, Rank Long-Term

Once you've optimized a page for your target keywords, leave it alone! Resist the urge to constantly rework your optimization strategy. Focus on creating high-quality content and letting your optimized pages work their magic.

How to Say Goodbye to ChatGPT with Zapier Chat

 Have you ever wished you could automate repetitive tasks across different apps without writing a single line of code? Well, your wish might be coming true with the arrival of Zapier Central, a brand new AI platform from the leader in no-code automation – Zapier.

Beyond Point-and-Click Automation: Introducing AI Bots

While Zapier has long been known for its user-friendly automation tools, Zapier Central takes things a step further. It allows you to create intelligent "bots" powered by AI that can streamline your workflow like never before. These bots can connect to various apps and data sources, understand your instructions in plain English, and then take automated actions based on your needs.

How to Make ClickBank Affiliate Marketing


This blog post analyzes a video promoting a method for earning money with ClickBank affiliate marketing. Here's a breakdown of the key points:

The Promise:

  • Make your first $1,000 on ClickBank in less than seven days.
  • Discover "underground" secrets used by top affiliates.
  • Copy and paste winning ad campaigns for fast results.

The Method (as presented in the video):

  1. Use a paid spy tool ("Spy Hero") to find top-performing ClickBank offers and winning ad campaigns.
  2. Focus on offers with a high percentage of affiliates promoting them and a large number of active ads.
  3. Analyze the top ads (especially those running for more than five days) to see what's working.
  4. Avoid copying creatives directly, but use them as inspiration to create your own landing pages and ad campaigns.
  5. Leverage AI tools like ChatGPT to rewrite ad copy and create variations.

Potential Issues:

  • Reliance on a paid tool (Spy Hero). There may be free alternatives or alternative methods for finding high-performing offers.
  • Focus on "copying" successful campaigns. While it can be a good starting point, true success often comes from creativity and strategic optimization.
  • Emphasis on speed over sustainability. Building a long-term affiliate marketing business requires more than just quick wins.

Additional Considerations:

  • The video promotes the speaker's affiliate links for the spy tool and their own training course.
  • The video doesn't delve into crucial aspects like traffic generation, campaign optimization, and ClickBank's terms of service regarding ad content.

Is this a guaranteed method for success?

The video presents a simplified approach. ClickBank affiliate marketing can be profitable, but success depends on various factors like niche selection, content quality, audience targeting, and campaign management.

What can you learn from this video?

  • Analyzing successful campaigns can be a valuable learning tool.
  • There are tools available to help with affiliate marketing research.

Do your research before investing in paid tools or courses. Explore free resources and alternative methods to find what works best for you. Remember, building a sustainable affiliate marketing business takes time, effort, and continuous learning.

Craft the Perfect Blog Post: A Step-by-Step Guide

 So you've decided to jump into the exciting world of blogging? Fantastic! But where do you even begin? Fear not, fellow wordsmith, because this guide will equip you with all the tools you need to create a compelling and informative blog post.

1. Brainstorm & Refine:

  • Find your niche: What are you passionate about? Cooking, travel, music? There's a blogosphere niche for everyone. Choose a topic that ignites your creativity and allows you to provide unique value to your readers.
  • Target your audience: Who are you writing for? Understanding your ideal reader will help tailor your content and tone for maximum impact.
  • Keyword research: Sprinkle relevant keywords throughout your post to improve search engine optimization (SEO) and attract organic traffic.

2. Structure for Success:

  • Captivating headline: Craft a clear, concise, and catchy headline that grabs attention and accurately reflects your post's content.
  • Engaging introduction: Hook your reader from the get-go. Briefly introduce your topic, pique their curiosity, and provide a roadmap of what to expect.
  • Subheadings for flow: Break down your content into digestible sections using clear subheadings. This enhances readability and guides your audience through your points.

3. Content is King:

  • Informative & valuable: Provide substantial and insightful information. Back up your claims with statistics, examples, or expert opinions.
  • Conversational tone: Maintain a friendly and approachable writing style. Imagine you're having a conversation with your reader.
  • Visual appeal: Images, infographics, or even videos can significantly boost engagement and understanding.

4. Polish & Promote:

  • Proofread meticulously: Typos and grammatical errors can turn readers away. Ensure your post is polished and error-free.
  • Call to action (CTA): Tell your readers what you want them to do next. This could be subscribing to your blog, sharing your post, or leaving a comment.
  • Promote your masterpiece: Share your blog post on social media, relevant online communities, or even guest-post on other blogs to reach a wider audience.

By following these steps, you'll be well on your way to crafting captivating blog posts that leave a lasting impression. Remember, consistency is key. Keep creating valuable content, and your blog will flourish in no time!

Thursday, May 23, 2024

How to Setting Up Google Tag Manager: A Complete Tutorial


 Do you ever wonder what visitors do on your website? Are they signing up for your newsletter? Clicking on your buttons? Downloading your resources? Google Tag Manager (GTM) is the key to unlocking these insights and taking your website to the next level.

This comprehensive guide will equip you with the knowledge to set up GTM and leverage its power to track essential website interactions. Even if you're new to GTM, don't worry! We'll walk you through everything step-by-step.

Why Use Google Tag Manager?

Imagine having to add lines of code to your website for every single tracking tool you want to use. Yikes! GTM eliminates this hassle by acting as a central hub for all your website tags. You can easily add, edit, and manage tags without touching your website's code.

Here are some of the amazing benefits GTM offers:

  • Simplified Tracking: No more messing with code snippets! Manage all your tracking needs from one convenient location.
  • Improved Website Performance: GTM ensures a faster loading website by eliminating the need for multiple tracking codes.
  • Enhanced Flexibility: Easily add new tracking tools or modify existing ones without any coding knowledge.
  • Effortless Troubleshooting: Identify and fix tag issues within GTM, saving you time and frustration.

Getting Started with Google Tag Manager

  1. Create a GTM Account: Head over to https://tagmanager.google.com/ and sign up for a free account.
  2. Set Up a Container: A container represents your website within GTM. Choose a name that clearly identifies your website.
  3. Install the GTM Code: GTM provides two code snippets. You'll need to add them to your website's header and body sections. Most website builders offer a user-friendly interface to insert these codes. If you're using WordPress, consider using a plugin like GTM4WP for easy installation.

Understanding Tags, Triggers, and Variables

  • Tags: These are snippets of code that send data to analytics platforms like Google Analytics.
  • Triggers: Triggers define when a tag should fire. For example, a trigger can be set to fire when a user clicks a button.
  • Variables: Variables store dynamic information captured from your website, such as form data or page URLs. They can be used within tags to personalize the data being sent.

Creating Your First Tracking Tag

Let's use GTM to track form submissions on your website. Here's a simplified breakdown:

  1. Create a Tag: Choose "Google Analytics" as the tag type and select "GA4 Event" to track a specific event (e.g., newsletter signup).
  2. Configure the Tag: Enter your Google Analytics measurement ID (found in your Google Analytics settings). Define the event name (e.g., "newsletter_signup").
  3. Set Up a Trigger: Choose "Form Submission" as the trigger type. Specify the form you want to track by using form classes or IDs. You can also add additional conditions to refine the trigger (e.g., only fire on a specific page).

Testing and Publishing Your Tags

GTM's preview mode allows you to test your tags and triggers before making them live. Ensure everything works as expected by submitting your form in preview mode. Once satisfied, publish your changes to make the tracking active on your website.

Beyond the Basics: Advanced Tracking with GTM

GTM's capabilities extend far beyond basic form tracking. You can leverage it to track button clicks, video engagement, scroll depth, and much more. With a little exploration, you can unlock valuable insights into user behavior on your website.

Keep Learning and Exploring

This guide provides a solid foundation for using Google Tag Manager. As you become more comfortable with GTM, explore its vast potential to take your website analytics to new heights. If you have specific tracking needs beyond this post, feel free to leave a comment below. We'll be happy to help or create a follow-up guide addressing common tracking scenarios.

Wednesday, May 22, 2024

How to Build a Shopify Store With AI (Just 15 Minutes!)


Ever dreamt of launching a booming Shopify drop shipping store but felt overwhelmed by the process? Buckle up, because AI is here to revolutionize your experience! This guide delves into AutoDS, a powerful tool that leverages AI to streamline store creation and product research, putting you on the fast track to e-commerce success.

AI to the Rescue: Introducing AutoDS

Imagine this: you brainstorm a niche and within minutes, a fully functional Shopify store stocked with high-potential products materializes before your eyes. That's the magic of AutoDS. Forget tedious product research and store building – AutoDS handles the heavy lifting, allowing you to focus on what truly matters: marketing and sales.

Step-by-Step: Building Your AI-Powered Store

Let's embark on this exciting journey together! Here's a breakdown of the process:

  1. Sign Up for AutoDS with a Special Offer: Click the link in the description to score an unbelievable 14-day trial for just $1!
  2. Connect AutoDS to Shopify: Seamlessly integrate AutoDS with your Shopify account for a smooth workflow.
  3. Harness the Power of AI: Select your niche (Home & Garden in our example) and let AutoDS leverage its AI technology to curate a pre-built Shopify store for you, complete with product suggestions.
  4. Claim Your Store Login Credentials: AutoDS provides you with login details to access your brand new Shopify store.
  5. Activate Your Shopify Store: Choose a plan that aligns with your needs and activate your store to unlock its full potential.

Taking Control: Customizing Your AI-Generated Store

While AutoDS lays the groundwork, your creative vision brings it to life. Here's where you personalize your store:

  • Refine Product Descriptions: AI-generated descriptions are a solid starting point. Enhance them with your unique voice and highlight product benefits for maximum impact.
  • Optimize Product Images: Replace generic images with high-quality visuals that showcase products in their best light. Use resources like Google to find captivating product photos.
  • Craft a Compelling Brand Name: Leverage AI tools like ChatGPT to generate catchy brand names that resonate with your target audience. In our example, "Luminat Trap" was born!
  • Design an Appealing Homepage: While the product page reigns supreme, don't neglect the homepage. Use AutoDS's customization features to curate a visually appealing and informative landing page.

From AI Powerhouse to Sales Magnet: Launching Your Store

With your customized store in place, it's time to unleash your marketing prowess and drive traffic. Popular social media platforms like TikTok and Instagram are excellent avenues to promote your chosen product.

The Ethical Considerations of AI-Powered Drop Shipping

While AI is a game-changer, ethical considerations are paramount. Here are some key points to remember:

  • Fact-Check AI-Generated Content: Double-check information for accuracy.
  • Maintain Transparency: Don't mislead customers – be upfront about using drop shipping.
  • Focus on Quality: Prioritize high-quality products that deliver value to your customers.

AI: A Tool for Empowerment, Not Replacement

AI is a powerful tool that streamlines processes and empowers entrepreneurs. However, it shouldn't replace human creativity and expertise. Use AI to your advantage, but remember – the success of your store ultimately lies in your marketing strategies, customer service, and dedication.

The Future of AI and E-commerce

The future of e-commerce is undeniably intertwined with AI. As technology advances, expect even more sophisticated tools that empower entrepreneurs to build and manage thriving online businesses.

Join the Conversation!

Are you ready to leverage AI to build your dream Shopify store? Share your thoughts and experiences in the comments below. Let's discuss the potential and ethical considerations of AI in e-commerce. Together, we can navigate this exciting landscape and unlock new heights of success!

Bypass AI Detectors and Boost Your Content: Is Bypass GPT the Answer?


 Tools like ChatGPT can churn out paragraphs in seconds, saving creators time and effort. But here's the rub: AI-generated content often gets flagged by plagiarism checkers and search engines due to its distinct patterns. This is where Bypass GPT enters the scene, promising to bypass AI detectors and make your content appear human-written.

The Allure of Bypass GPT

Imagine this: you brainstorm a blog post topic, feed it to ChatGPT, and receive a well-structured, informative piece in minutes. However, you know school plagiarism checkers like Turnitin or AI scanners like GPT-Zero will raise red flags. This is where Bypass GPT steps in. The blog post demonstrates how Bypass GPT can transform AI-generated text, dramatically reducing its AI "fingerprint."

Does it Really Work? Putting Bypass GPT to the Test

The blog post takes you through a practical example. We craft a paragraph using ChatGPT about the history of emojis (because, who doesn't love a good emoji?). Here's the outcome:

  • Original AI Text: Analyzed by GPT-Zero, it scores a perfect 100% – flagged as AI-generated.
  • "Rewritten" by ChatGPT: We naively believe rewriting with another AI tool will do the trick. Unfortunately, GPT-Zero still detects it as 100% AI.
  • The Bypass GPT Magic Touch: We paste the text into Bypass GPT and select "Human Eyes" mode. The tool rephrases the content, aiming to mimic human writing style. Remarkably, GPT-Zero now scores the text close to 0% - human-written!

Beyond the Score: Ethical Considerations

The blog post acknowledges the ethical gray area. While Bypass GPT can be tempting for content creators and website owners seeking SEO advantages, it raises concerns.

  • Impact on Learning: Overreliance on AI-generated content for school assignments can hinder critical thinking and writing skills.
  • Content Quality: Bypassing AI detection doesn't guarantee high-quality content. It's crucial to edit and add your own insights for a truly engaging piece.

The Verdict: Is Bypass GPT Your Content Creation Ally?

The answer depends on your goals. If you're a content creator seeking a starting point for blog posts or website copy, Bypass GPT can be a helpful tool. However, remember:

  • Fact-check and Edit: AI-generated content can contain factual errors. Always double-check information and inject your own voice and expertise.
  • Maintain Academic Integrity: Bypassing AI detection tools for school assignments is a form of plagiarism. This blog post does not endorse such practices.

The Future of AI and Content Creation

AI is a powerful tool, and its impact on content creation is undeniable. As AI and detection tools continue to evolve, the line between human and machine-generated content will blur further. It's our responsibility to navigate this landscape ethically and ensure AI enhances, not replaces, human creativity.

Let's Talk!

Do you think AI poses a threat to learning and content quality? Share your thoughts and experiences with AI content creation in the comments below! We'd also love to hear your take on the ethical implications of Bypass GPT.

What is the Instagram Bonuses Program and Earning Breakdown


Imagine getting paid for your Instagram content – reels, photos, and carousels! That's the basic idea behind the program. It's currently invite-only, and creators are paid based on "bonus plays" rather than every single view.

My Experience: A Trail of Exploration

I recently joined the program (it's my fourth month!), and let me tell you, there wasn't much information readily available. So, I decided to create the video I always wished existed!

Earning Breakdown (April-May 2024):

Here's a glimpse into my earnings for the period April 15th to May 14th:

  • Photos: I experimented with carousels this month and made $7.80 with only 32,000 qualified views (around 24 cents per thousand views).
  • Reels: Despite having 200,600 bonus play views, I earned $35.97 (around 17 cents per thousand views). This is a significant jump from the previous month's 9 cents!

Total Earnings: $43.75 might not seem like a fortune, but for minimal effort, it's not bad!

Key Takeaways:

  • Focus on Both Photos & Reels: While Instagram seems to be favoring photos currently, reels still hold potential.
  • Engagement Matters: Just like with YouTube, content that sparks engagement (likes, comments) influences payouts.
  • Transparency is Key: I compared Instagram to YouTube Shorts. Both yielded similar earnings (around $17 per thousand views) for the same period. Short-form content creation can be quite lucrative!

Call to Action:

  • Join the Discussion: If you're in the program, share your experiences!
  • Explore Short-Form Content: Curious about maximizing short-form content across platforms? Let me know in the comments!

Disclaimer:

This information is based on my personal experience during a specific timeframe. The program is still under development, and earnings can vary significantly.

How to Make 5x More Money with A Faceless Video AI Prompt


 Imagine building a YouTube empire with minimal effort and zero need to show your face. This blog post explores the exciting world of faceless YouTube channels and unveils a powerful tool – AI-powered text-to-video – that can revolutionize your content creation process.

Why Faceless Channels?

Faceless channels offer a unique opportunity to create engaging content without the pressure of being on camera. This approach is perfect for those who are camera-shy or simply prefer to focus on the content itself. Here's a glimpse into the benefits:

  • Accessibility: Anyone can create content, regardless of location or appearance.
  • Scalability: Easily replicate successful video formats across multiple channels.
  • Content Variety: Explore various niches without limitations.

The Power of Multiple Channels

The video mentions a strategy employed by big YouTubers like MrBeast: creating dedicated channels for different languages. This allows you to cater to specific audiences and maximize your reach.

AI Text-to-Video: Your Content Creation Ally

Invid AI is introduced as a revolutionary tool that streamlines video creation for faceless channels. Here's what it can do:

  • Generate Entire Videos: Craft a script, choose a niche, and let Invid AI handle the heavy lifting – scriptwriting, stock footage selection, and basic editing.
  • Multiple Languages in Minutes: Create variations of your video in different languages with a single prompt. No need to be multilingual!
  • Voice Cloning (Optional): Maintain a personal touch by incorporating your own voice into the videos.

Getting Started with Faceless YouTube Channels & Invid AI

The blog post doesn't delve into the specifics of Invid AI's functionalities, but it provides a basic roadmap:

  1. Choose a Niche: Select a niche that aligns with your interests and offers potential for automation.
  2. Craft Your Script: Provide a clear and concise script to guide Invid AI's video creation.
  3. Personalize (Optional): Incorporate your voice and preferred visuals for a more engaging experience.
  4. Export & Upload: Export your creation(s) and upload them to your YouTube channel(s).

Remember: While AI is a powerful tool, adding your personal touch can significantly enhance your content.

Conclusion

Faceless YouTube channels offer a unique and exciting avenue for content creators. By harnessing the power of AI text-to-video tools like Invid AI, you can streamline your workflow, expand your reach, and potentially build a thriving YouTube empire – all without ever showing your face.

YouTube Hashtags Decoded: 3 Strategies to Explode Your Video Views


 Have your YouTube views plateaued? You're not alone. But what if the secret to skyrocketing your audience lies in a few simple hashtags?

That's right! Hashtags are a powerful tool for getting your videos discovered by the right viewers on YouTube. But with recent changes to the platform, using the right hashtags is more crucial than ever.

In this post, we'll crack the YouTube hashtag code and reveal 3 powerful strategies to maximize your video reach. Plus, you'll get access to free downloadable templates to streamline your hashtag research and implementation!

The 3 YouTube Hashtag Strategies You Need

#1. Niche-Specific Hashtags: Speak Your Audience's Language

Imagine searching for "how to invest in real estate" on YouTube. The top videos likely use relevant hashtags like #realestate, #money, #downpayment, etc. These are your niche-specific hashtags – words or phrases highly relevant to your video content and target audience.

Here's how to find the perfect niche hashtags:

  1. Search for Your Video Topic: Look at the hashtags other creators in your niche are using. This gives you a starting point.
  2. Use YouTube's Search Suggest: As you type a hashtag, YouTube suggests popular related options.
  3. Prioritize Relevance & Search Volume: Choose hashtags with a decent search volume but not overwhelming competition.

#2. Leverage #Shorts for Short-Form Content

YouTube prioritizes promoting Shorts content. Including "#shorts" in your title (for Shorts) or description (for long-form content) helps the algorithm categorize your video correctly. This can significantly boost your reach within the Shorts section.

#3. Power Up Your Long-Form Content with 3 Niche Hashtags

For longer videos, focus on 3 highly relevant niche hashtags. This sweet spot allows you to target a specific audience while maximizing reach.

Bonus Tip: Utilize YouTube's Trending Hashtags bar to identify popular topics and potentially leverage them in your content strategy.

Free Templates to Master Your YouTube Hashtags

Download our free templates (linked in the description below) to streamline your hashtag research and implementation:

  • Niche Hashtag Research Template: Organize your niche keywords and discover relevant hashtags.
  • YouTube Video Description Template: Craft compelling descriptions that include your chosen hashtags.

Conclusion

By implementing these 3 hashtag strategies and using the free templates, you'll be well on your way to unlocking the power of YouTube hashtags and attracting a massive audience to your channel.

But remember, subscriber growth is a multi-faceted game. Don't miss the pinned comment below where we explore other factors influencing YouTube success, like titles, thumbnails, and descriptions!

Ready to take your YouTube channel to the next level? Let us know in the comments what content creation struggles you're facing!

Can Fewer Ads Mean More Money? Testing a Website Revenue Strategy


This blog post dives into a website optimization experiment to see if reducing the number of ads can actually increase revenue. The website in question, run by Lucy, a horse enthusiast, had seen a significant drop in traffic after a Google algorithm update. The culprit? Ads. The website was overloaded with intrusive ads, creating a poor user experience.

The Hypothesis: By reducing the number of ads and improving the overall user experience, the website can attract more visitors and keep them engaged for longer, ultimately leading to higher total ad revenue despite a decrease in earnings per thousand views (EPMV).

The Process:

  1. Ad Reduction: The first step involved analyzing the website's ad layout and placements. The goal was to comply with the Coalition for Better Ads standards, which recommend an ad density below 30% on any given screen. This meant removing in-content ads, video ads (though set to play less frequently), and reducing the number of sidebar ads.
  2. Improved User Experience: A community poll helped identify the most intrusive ad formats. Next came internal linking. The top 10 blog posts by traffic were analyzed, and relevant internal links were added to existing content. This strategy aimed to keep users engaged and exploring the website for longer.

The Results (After 2 Weeks):

  • EPMV: As expected, earnings per thousand views decreased by 17.5%.
  • Total Ad Revenue: Surprisingly, total ad revenue only dropped by 11%.
  • Website Traffic: Sessions on the website increased by 7.5%.

Why This Matters:

This experiment suggests a positive correlation between a better user experience (fewer ads) and increased website traffic. While long-term impacts on ad revenue and Google ranking remain to be seen, the initial results are promising. This approach can help websites:

  • Build Credibility: A positive user experience builds trust with both visitors and Google.
  • Grow Organically: A website with a good reputation attracts more visitors without relying solely on ads.

The Takeaway:

This experiment highlights the importance of user experience in website optimization. Striking a balance between ad revenue and user experience can be key to long-term website success.

Future Steps:

The blog post concludes by mentioning future plans for the website, including exploring social media strategies and content optimization. The progress and impact of these efforts will be covered in future videos.

How to Make Your Faceless YouTube Shorts Go Viral


Ever wondered why some faceless YouTube Shorts rack up millions of views while others struggle to break 500? The answer lies in a specific formula successful creators use to captivate audiences. This blog post dives into what makes shorts go viral and equips you with the knowledge to create your own viral hits.

Finding the Right Idea: It All Starts with a Bang

  • Concept is King: A bad video idea won't go viral no matter how well-produced it is. Focus on captivating concepts that genuinely pique viewers' interest. Here are some strategies to brainstorm winning ideas:
    • Become a Niche Ninja: Deeply understand your niche. What are viewers most curious about? What problems do they face? Cater your content to address these specific needs and interests.
    • Competitor Analysis Done Right: Don't just watch top-performing shorts in your niche; analyze them! Look for recurring themes and topics that resonate with your audience. Identify gaps in content and create videos that address those.
    • Think Outside the Niche: Don't limit yourself entirely. Adapt trending ideas from other niches to create fresh content for your audience. For example, if your niche is ocean facts, you could leverage the recent popularity of space exploration to create a short about the Mariana Trench being "Earth's Final Frontier."
    • Stay Current: Tap into current events and trending topics. Use tools like AnswerThePublic and YouTube search to identify what people are buzzing about. Let's say there's a documentary about the Great Barrier Reef trending. You could create a short about fascinating creatures found there, capitalizing on the existing interest.

Packaging Perfection: Titles & Thumbnails that Convert

  • The Enticing Trio: Title, thumbnail, and hook work together to determine if viewers click. They should function as a cohesive unit. Imagine them as a movie trailer – they need to be enticing enough to make viewers want to see the full picture.
  • Headlines that Hook: Craft short, curiosity-inducing titles (ideally under 6 words) that make viewers want to know more. Don't just state a fact; ask a question or create a sense of mystery.
    • For example, instead of "5 Weird Ocean Creatures," try "These Ocean Freaks Will Blow Your Mind!"
  • Thumbnail Power: Design thumbnails with a clear focal point, bold text, and visuals that evoke emotion. Use high-quality images or short video snippets that directly relate to the content.
    • People are drawn to faces, so consider using close-up shots of intriguing animals or objects from your video in the thumbnail.

Scripting for Success: Keeping Viewers Engaged

  • The Irresistible First 3 Seconds: Grab viewers' attention within the first few seconds. Use shocking visuals, intriguing questions, or a surprising statement to hook them.
    • Think about the psychology of curiosity. Tease a mind-blowing fact or ask a question viewers wouldn't expect.
  • Weaving a Narrative: Build a story with strategic curiosity peaks throughout. Keep viewers guessing and wanting more. Don't reveal everything in the first few seconds; create a sense of anticipation.
    • Here's an example: "Did you know a Bald Eagle's nest can weigh up to 2 tons?" (intriguing fact) Cut to dramatic music and an image of a massive eagle's nest (curiosity peak) "But that's not all! These nests hold a dark secret..." (builds anticipation)
  • Length Matters: Aim for shorter videos (ideally under 60 seconds) that capitalize on viewers' limited attention spans. People scroll quickly through their feeds, so get to the point fast and deliver value quickly.

Visual Storytelling: Matching the Message with the Medium

  • Relevance is Key: The visuals you use should directly connect to the narrative you're building. Elicit the desired emotions through relevant visuals. Don't just throw in random stock footage; choose visuals that enhance the story.
    • If you're talking about the beauty of the ocean, use stunning underwater footage. If you're discussing a scary deep-sea creature, use dark, ominous visuals.
  • Quality over Stock: While high-quality visuals are important, prioritize relevance over generic stock footage. Use real footage or images whenever possible. This adds authenticity and helps you stand out from creators relying solely on stock assets.

Consistency is Key: Building a Loyal Audience

  • Regular Uploads are Crucial: Consistent publishing is vital for YouTube success. It keeps viewers engaged and reinforces your channel's authority. Aim for a consistent upload schedule, whether it's daily, weekly, or bi-weekly.
  • Beat the Slump: Develop a system for consistent content creation to avoid burnout. Here are some tips:
    • Plan Ahead: Create a content calendar to plan out your videos for the week or month. This helps you stay organized and avoid last-minute scrambles.
    • Batch Production: Film or create multiple videos at once to save time and effort. This can help you stay ahead of schedule and reduce stress.
    • Utilize Tools: Use editing software and project management tools to streamline your workflow. This can free up time for more creative endeavors.

Bonus Tip: AI-Powered Creation

In today's fast-paced digital world, AI can be a valuable tool for content creators. The blog post mentions an AI tool that can streamline the short creation process. It can generate a video script based on a text prompt and even clone your voice for narration.

Remember: While AI tools can be helpful, prioritize creating high-quality content with genuine value for your viewers. AI can't replace creativity or the human touch. Use it as a tool to enhance your work, not as a replacement for your skills and expertise.

Conclusion

By following these tips and understanding the formula behind successful faceless shorts, you'll be well on your way to creating viral content that captures your audience's imagination. Remember, success on YouTube takes time, effort, and a genuine passion for your craft. Don't get discouraged if you don't see results overnight. Keep creating, keep learning, and keep refining your skills. With dedication and perseverance, you'll be well on your way to becoming a YouTube sensation.

Additional Tips for Success

  • Engage with your audience: Respond to comments, answer questions, and participate in discussions. This helps you build a community around your channel and keep viewers coming back for more.
  • Promote your content: Share your videos on social media, embed them on your website, and collaborate with other creators. The more people who see your content, the greater your chances of success.
  • Analyze your performance: Use YouTube Analytics to track your video views, engagement metrics, and audience demographics. This data can help you identify what's working and what's not, so you can refine your strategy accordingly.

Remember, creating successful faceless YouTube Shorts is a journey, not a destination. Enjoy the process, learn from your experiences, and keep experimenting until you find your unique formula for success.

Zuplo API Gateway Release Monetization Option, Monitoring via OpenTelemetry, and a Developer-First Focus Guide


 Zuplo just got even better for developers! This month's release brings exciting features across the board, designed to streamline your API development workflow, enhance monitoring, and unlock new monetization opportunities.

Monetize Your APIs with Zuplo (Available to All Users)

We're thrilled to announce the official launch of Zuplo API Monetization! Now, you can easily monetize your APIs through the developer portal. This update includes:

  • Improved Stripe webhook error handling: Streamlined management of Stripe webhooks for a smoother payment experience.
  • Enhanced documentation: Clearer and more comprehensive documentation for configuring monetization.
  • Editable plans: Tailor your monetization strategy with the ability to create and manage custom plans.

Get started with Zuplo monetization today and start earning from your APIs! For a quick guide, check out our documentation.

Supercharge Your API Monitoring with OpenTelemetry (Zuplo Enterprise Plan)

Gain deeper insights into your API performance with our brand-new OpenTelemetry plugin. This powerful tool allows you to:

  • Trace request timings: Identify bottlenecks and optimize your API performance.
  • Visualize spans: Gain detailed insights into the execution flow of plugins, handlers, and policies.
  • Send trace data to any OpenTelemetry service: Integrate seamlessly with popular services like Honeycomb, Dynatrace, or Jaeger.

Unlock a world of performance insights with the Zuplo OpenTelemetry plugin. Head over to our docs to learn more and activate your Zuplo Enterprise plan.

Developer Portal Enhancements

We've revamped the developer portal to make your Zuplo experience even smoother:

  • Fresh new layout: Enjoy a cleaner and more intuitive design.
  • Developer-friendly fonts: Improved readability for extended coding sessions.
  • CMD+K navigation: Quickly access functionalities with keyboard shortcuts.
  • Consolidated services section: Easily manage API keys, monetization settings, and more in one place.
  • New usage dashboard: Track key metrics like requests, compute usage, and bandwidth consumption.

New In-Built Policies

Empower your API management with two powerful new policies:

  • API Brownout policy: Simulate API outages for controlled user migrations and maintenance windows.
  • Curity Phantom Token policy: Leverage Curity's identity management for enhanced token handling and security.

AI-Powered Documentation Search

Finding the information you need in our extensive documentation just got easier. We've integrated Inkeep's AI-powered search, allowing you to:

  • Quickly locate relevant documentation: Search by keywords and get instant results.
  • Receive AI assistance for common queries: Get helpful suggestions and clarifications directly within the search bar.

Unified Development and Production Environments

Ensure seamless transitions between development and production with our unified environments. This update allows you to:

  • Test changes in a production-like setting: Identify and fix issues before deployment.
  • Experience consistent performance handling: Avoid surprises and ensure your APIs perform as expected.

For a complete breakdown of these features and more, visit our changelog.

We're constantly striving to make Zuplo the best platform for developers. With this April release, we've delivered features that empower you to build, monitor, and monetize your APIs with greater ease and efficiency. Stay tuned for even more exciting updates in the coming months!

TOP 6 Scala Web Frameworks you can try


Web frameworks are essential tools for web developers, providing "libraries of code that make life easier for developers when building reliable, scalable, and maintainable web applications."

By offering reusable code or extensions for common operations, web frameworks liberate developers from reinventing the wheel, enabling them to focus on the core application logic rather than fundamental elements.

Benefits of Using Web Frameworks

  • Save Time: Frameworks equip developers with ready-to-use code for common tasks, eliminating the need to write code from scratch.

  • Enhance Code Quality: Frameworks often adhere to best development practices, guiding developers towards crafting cleaner and more maintainable code.

  • Boost Productivity: With frameworks, developers can channel their efforts towards the unique functionalities of their applications instead of getting bogged down in the basics.

Top Scala Web Frameworks

While Scala shines as a powerful programming language, the selection of web frameworks for Scala remains relatively limited. Choosing the right framework is crucial for aligning with project requirements. Here's a curated list of the top 6 Scala web frameworks to consider:

1. Play:

Play emerges as a full-stack web framework built upon a lightweight, stateless, and web-friendly architecture. Renowned for its ease of use, comprehensive documentation, and active community, Play caters to a wide range of web projects, from simple web applications to complex APIs.

2. Xitrum:

Xitrum distinguishes itself as an asynchronous and clustered Scala web framework. This implies that Xitrum can handle numerous requests concurrently and scales effectively for high-traffic web applications. Additionally, Xitrum boasts an embedded HTTP server, eliminating the need for a separate web server installation.

3. Finatra:

Finatra takes the stage as a Scala service framework built atop TwitterServer and Finagle. Finatra places its focus on the development of scalable and fault-tolerant microservices. It serves as an excellent choice for crafting APIs and backends for web applications.

4. Lift:

Lift stands tall as a powerful and secure web framework. Composed of modular elements, Lift empowers developers to leverage these components individually or combine them to construct intricate web applications. Lift is recognized for its functional approach to web development.

5. Udash:

Udash steps forward as a Scala web framework centered on the creation of engaging and maintainable front-end web applications. Udash seamlessly integrates with popular JavaScript libraries like React and SPAs (Single Page Applications).

6. Skinny:

Skinny emerges as a full-stack web framework tailored for building Servlet-based web applications. Skinny offers a more traditional approach to web development and provides a plethora of built-in features, including routing, templating, and form validation.

Conclusion

Each of these six Scala web frameworks boasts its own strengths and characteristics. The optimal framework selection hinges on the specific project requirements. Carefully evaluate the unique attributes of each framework to identify the perfect match for your web development endeavors.

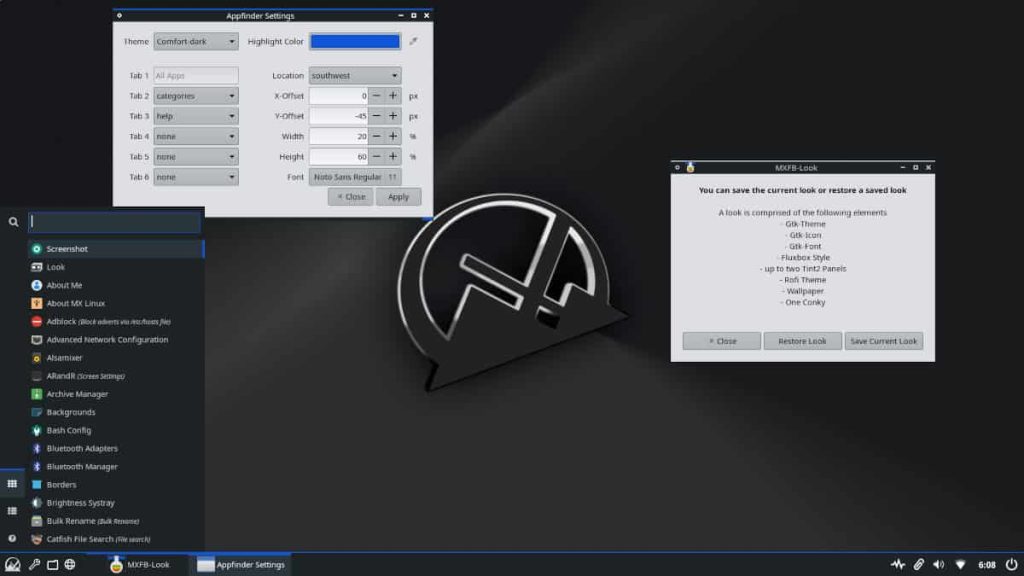
MXLinux 23.3 is Released, Unveils Enhanced Stability and New Features


 The wait is over as the MX Linux team proudly announces the general availability of MX Linux 23.3, the third stable update for the latest MX Linux 23 "Libretto" series.

MX Linux, a Debian-based distribution renowned for its user-friendliness and supportive community, offers the "Libretto" series in various desktop editions, including Xfce, KDE Plasma, and Fluxbox. A special Raspberry Pi edition caters to users of these popular mini-computers.

Cloudflare Workers AI Pricing


Cloudflare Workers AI, the game-changing platform that empowers developers to seamlessly run AI models, is now available in both Free and Paid Workers plans! This article delves into how its pricing scheme works, including the unique "Neuron" concept and a comparison with similar services.

Get Started with Free for Everyone!

Workers AI understands that even budding developers want to experience the power of AI. Therefore, they offer a generous free allocation of 10,000 Neurons per day. With this allowance, you can experiment with various AI models without incurring any costs.

Neuron: The Unit for Measuring AI Usage

Workers AI utilizes "Neuron" as the unit for measuring AI model usage. Each model requires a different number of Neurons to process data. For instance, 10,000 Neurons can be used to:

  • Generate 100-200 responses from a large language model (LLM)
  • Translate 500 texts
  • Transcribe 500 seconds of audio into text
  • Perform text classification 10,000 times
  • Create 1,500 - 15,000 text embeddings (depending on the model)

With the serverless pricing model, you only pay for what you use. No more hassles of GPU rental, management, or scaling. Curious about how many Neurons your project might need? Try using Workers AI's cost calculator.

Exceed the Free Allowance? No Worries, Paid Plans Await!

The free 10,000 Neuron per day allocation applies to post-beta models. If you require more than that amount, or wish to use beta models, then you'll need to switch to a Paid Workers plan. The cost is $0.011 per 1,000 Neurons used beyond the free allowance.

All Limits Reset Daily

The free allocation and daily usage limits reset every 00:00 UTC. If the limit is exceeded, subsequent operations will fail with an error message.

Beta Models vs. Non-Beta Models

Starting April 1, 2024, certain models will incur charges after the free 10,000 Neuron per day allocation is exceeded. These models are:

  • bge-small-en-v1.5
  • bge-base-en-v1.5
  • bge-large-en-v1.5
  • distilbert-sst-2-int8
  • llama-2-7b-chat-int8
  • llama-2-7b-chat-fp16
  • mistral-7b-instruct-v0.1
  • m2m100-1.2b
  • resnet-50
  • whisper

Cloudflare will continue to calculate Neuron costs for other models and bring them out of beta in the future.

Workers AI vs. Competitors: Cost Comparison

Workers AI employs Neurons to measure and charge for AI usage. This might differ from the input-based pricing schemes offered by other providers. To facilitate comparison, Workers AI provides a table of estimated Neuron costs and usage for various available models.

Please note that the following information is for comparison purposes only. All conversions are based on Cloudflare's public pricing as of March 1, 2024, and do not include taxes or other fees.

Example Usage:

Suppose you use 50,000 Neurons per day for a month. The cost would be:

(50,000 Neurons - 10,000 free Neurons) * 30 days * $0.011 per 1,000 Neurons = $13.20

With a generous free allowance and a per-use payment model, Workers AI presents a cost-effective and predictable AI solution. Intrigued to give Workers AI a try? Visit Cloudflare's website to get started!

Bonus: Price Change Archive

Cloudflare is committed to continuously optimizing their platform and delivering value to customers. For instance, on April 2, 2024, they reduced the pricing for mistral-7b-instruct by 17x and llama-2-7b-chat-int8 by 7x. You can check out the "Price Change Archive" table to see how the prices of these models have evolved

Get Ready for Ubuntu 24.10 (Oracular Oriole): A Polished and User-Friendly Release


 Calling all Ubuntu enthusiasts! Mark your calendars for October 10, 2024, as the highly anticipated Ubuntu 24.10 (Oracular Oriole) is set for release. Oliver Smith, Technical Director for the Ubuntu Desktop team at Canonical, recently shared the strategic vision for this upcoming version, and it's packed with exciting enhancements and user-centric features.

A Focus on Refinement and User Experience

The Ubuntu 24.10 development team is adopting the overarching theme of "polish, polish, polish." This signifies their dedication to refining the operating system's integration and functionality, continuing the evolution that began with Ubuntu 22.04 LTS (Long Term Support). These improvements are expected to be well-received not only by diehard Ubuntu fans but also by the wider open-source community. Let's delve into the details of the updates that Ubuntu 24.10 brings to the table!

Enhanced User Experience

A key focus area is enhancing the user experience, especially for new users. The previously introduced Flutter-based installation process will receive further refinements. Ubuntu 24.10 will offer broader hardware support, including TPM (Trusted Platform Module)-backed Full Disk Encryption.

Additionally, more granular feedback mechanisms will be available to address device configuration issues. Not to be overlooked, NVIDIA driver support will also be enhanced in line with Ubuntu's commitment to user security and accessibility.

Redesigned Welcome Wizard and Improved App Ecosystem

Post-installation, users will be greeted by a redesigned welcome wizard. This wizard promises a smoother transition from the installation process to the desktop, resulting in a more consistent user experience.

Ubuntu 24.10 will also bring enhancements to the App Center. Users can look forward to a richer app search experience and stronger backend support for app ratings. Another exciting update is related to the management of snaps, Ubuntu's universal packaging system.

Flutter: The Future of Ubuntu Apps

Despite reports of Google downsizing its Flutter development team, Canonical remains highly committed to the framework. Ubuntu 24.10 will continue to utilize Flutter as the foundation for developing all its new apps. This approach ensures cross-platform compatibility for applications developed within the Ubuntu desktop environment.

Upcoming updates include the migration from GTK3 to GTK4 for performance and accessibility gains, improved localization, and integration of Linux-specific features.

GNOME and Wayland

Ubuntu 24.10 will make Wayland the default display for users with NVIDIA graphics cards. This is a significant step considering the compatibility hurdles that have been faced in the past. The switch to Wayland is expected to boost performance and security, particularly in areas like AI/ML (artificial intelligence/machine learning) and VFX (visual effects) that heavily utilize Ubuntu.

Ubuntu Core Desktop

Behind the scenes, Canonical is developing Ubuntu Core Desktop, a version of Ubuntu specifically designed for IoT devices and embedded systems. Ubuntu Core Desktop emphasizes the concept of "composable immutability" to deliver a more secure and stable desktop experience.

Moreover, the transition from "aad_auth" to "authd" will bring enhanced support for cloud-based identity services like Microsoft Entra ID. This will make device enrollment and multi-factor authentication smoother.

Opportunities to Join the Ubuntu Development Team

Another interesting point from Oliver Smith's post is Canonical's plan to expand the Ubuntu Desktop team. This is great news considering a common perception that Canonical has been more focused on server products aimed at enterprise customers lately. For those passionate about shaping the future of Linux desktops, this is a golden opportunity to join the Ubuntu team!

Celebrating 20 Years of Ubuntu

Not to be forgotten, October 2024 marks 20 years since Ubuntu's journey began with the launch of its first operating system, Ubuntu 4.10 (Warty Warthog). To commemorate this special milestone, one can be sure that Ubuntu 24.10 (Oracular Oriole) will be even more special than previous interim releases. So, get ready to embrace a new era of Ubuntu that is more polished, high-performing, and, of course, user-friendly!

NetBSD is Banned AI Generated Code


The open-source software development world is once again abuzz with debate surrounding the use of artificial intelligence (AI). Following Gentoo Linux's outright ban on AI-generated code in their distro, it's now NetBSD's turn, a popular Unix-based operating system, to implement strict policies regarding this matter.

NetBSD Rejects AI-Generated Code

In an official announcement, NetBSD declared that code produced by Large Language Models (LLMs) like OpenAI's ChatGPT and GitHub/Microsoft's Copilot is considered "tainted." This term refers to the unclear copyright and licensing status of such code. As a result, AI-generated code cannot be included in the NetBSD repository.

Reasons Behind the New Policy

This new policy is based on several key concerns of NetBSD:

  • Copyright Uncertainty: LLMs are trained using massive amounts of data from various sources. This potentially results in code containing snippets of copyrighted code from different sources, including proprietary ones.

  • License Violations: NetBSD has a strict licensing policy. Code submitted to the repository must have a license that allows free distribution. With the ambiguity of AI-generated code's origin, NetBSD finds it difficult to ensure compliance with such licenses.

  • Ethical and Legal Issues: The process of AI code generation still sparks debate. There are concerns that AI could produce code that violates ethics or even potentially lead to legal issues in the future.

Strict Policy: Written Approval Required

To avoid these risks, NetBSD has implemented a rather strict policy:

  • Code Origin Verification: Developers are required to ensure that the code they submit comes from a clear source and has proper authorization.

  • Written Approval from Core Team: If developers still want to use AI-generated code, they must obtain written approval from members of the NetBSD core team. This is done to further evaluate potential licensing and ethical issues.

Difficult to Prove Code Origin

Despite this policy, there is currently no definitive way to distinguish whether code was written by a human or generated by AI. However, NetBSD's move demonstrates their commitment to maintaining transparency and freedom of code distribution in their projects.

Impact and Future

NetBSD's policy has triggered mixed reactions. On the one hand, the move is seen as necessary to maintain code quality and security. On the other hand, some are concerned that it could hinder software innovation and development.

The debate surrounding AI usage in software development is likely to continue. NetBSD, along with Gentoo Linux, has taken a firm step in regulating its use. These decisions may set a precedent for other open-source projects in the future.

via emka.web.id

Tuesday, May 21, 2024

Troubleshooting Windows 11 Laptop Shutting Down When Unplugged pen_spark


 Ever experienced your Windows 11 laptop shutting down abruptly when unplugged from the charger? You're not alone! This issue is quite common and can be caused by various factors, such as a faulty battery, outdated battery drivers, or power problems.

Before You Begin:

Before attempting the troubleshooting steps below, we recommend running the Windows 11 Power Troubleshooter. This tool can help detect and fix common power-related issues on your laptop.

Solutions:

1. Hard Reset the Laptop:

Residual charge in your laptop's capacitors can sometimes cause this issue. A hard reset can help drain that charge. Here's how:

  • Turn off your laptop completely.
  • Unplug the charger and all peripherals.
  • Remove the battery (if removable).
  • Press and hold the power button for 30 seconds.
  • Reinsert the battery and connect the charger.
  • Turn on your laptop and check if the issue is resolved.

2. Check Battery Health:

A damaged battery could be the culprit behind this problem. Check your battery health using the Windows 11 Battery Efficiency Diagnostic Report Tool. You can also use third-party battery testing software or a dedicated app from your laptop manufacturer.

3. Disable Fast Startup:

Fast Startup can sometimes lead to this issue. Try disabling Fast Startup from the Control Panel:

  • Open the Control Panel.
  • Choose Power Options.
  • Click "Change settings that are currently unavailable".
  • Uncheck "Turn on fast startup (recommended)".
  • Click "Save changes".

4. Update or Reinstall Battery Drivers:

Outdated battery drivers can cause problems. Try updating or reinstalling your battery drivers:

  • Open Device Manager.
  • Expand the "Batteries" section.
  • Right-click on your battery driver and select "Uninstall device".
  • Restart your PC. The driver will be reinstalled automatically.

You can also scan for hardware changes to manually reinstall the battery driver.

Alternatively, download the latest battery driver from your laptop manufacturer's official website and install it manually.

5. Roll Back Battery Driver:

You can try rolling back the battery driver to a previous version:

  • Open Device Manager.
  • Expand the "Batteries" section.
  • Right-click on your battery driver and select "Properties".
  • Open the "Driver" tab.
  • Check if the "Roll Back Driver" button is available. If yes, click the button.
  • Follow the on-screen instructions.
  • Restart your computer.

6. Calibrate Laptop Battery:

Battery calibration can help resolve this issue. Follow the instructions from your laptop manufacturer to calibrate the battery.

7. Reseat RAM:

Problematic or improperly seated RAM can cause this issue. Try reseating your RAM and check if the problem persists. You can also test the RAM using the Windows 11 Memory Diagnostic Tool.

8. Update BIOS:

Update your laptop's BIOS to the latest version. Check your BIOS version and download the update from your laptop manufacturer's official website.

9. Replace Battery:

If all the above solutions fail, your battery might be damaged. Consult a technician to replace the battery.

Additional Tips:

  • Ensure your laptop doesn't overheat during use.
  • Avoid leaving your laptop turned off and plugged in for extended periods.
  • Use the original charger from your laptop manufacturer.
  • Back up your data regularly.

Note:

The information above is general and might not apply to all laptop models. Always refer to your laptop manufacturer's instructions for more specific solutions.

Hopefully, this guide helps you resolve the issue of your Windows 11 laptop shutting down when unplugged!

What is Google Veo?

 Remember the AI image generator craze of 2023? Well, tech giants are now moving on to the next stage: AI video creation. After OpenAI introduced Sora, their text-to-video generator, in February 2024, it was only a matter of time before Google followed suit.

And at Google's annual I/O developer conference last Tuesday, Google officially unveiled Veo, their most advanced text-to-video generator yet. Veo can generate 1080p resolution videos that can last over a minute!

Beyond Text-to-Video: Unleashing Creative Control

In addition to the high-quality output, Google claims that Veo offers its users an "unprecedented level of creative control." Its deeper natural language understanding allows Veo to capture richer details from longer prompts and understand cinematic terms like "timelapse" or "aerial shots."

Addressing Video Smoothness Challenges

One common challenge in AI video generation is the smoothness of transitions between scenes. According to Google, Veo can produce consistent footage, with various subjects like humans, animals, and moving objects acting realistically in the video.

Google's Advancements in AI Video Creation

Veo's capabilities are certainly exciting news! The arrival of Veo marks Google's progress in AI video creation. Google mentions that the model is built on top of all their previous video generation projects, including Imagen-Video, VideoPoet, and Lumiere.

Limited Access for Now

Similar to OpenAI's Sora, Google's Veo is not yet publicly available. Currently, Google is only sharing Veo with select creators through a private preview within the VideoFX platform. However, you can join the waitlist to try the model in the future.

Imagen 3: Enhancing AI Image Generation

Alongside Veo, Google also introduced Imagen 3, their highest-quality text-to-image model to date. Imagen 3 offers improved image quality and reduced visual artifacts. Like Veo, Imagen 3 is also only available for private preview within ImageFX for select creators and has its own waitlist.

AI Video Generation: The Future of the Creative Industry?

AI video generation technology like Veo has the potential to bring about significant changes in the creative industry. Video creators can easily generate explainer videos, promotional presentations, and even simple entertainment content using text prompts.

However, it's important to remember that this technology is still in its early stages of development. We need to see how Google and other companies continue to refine the capabilities of Veo and similar models in the future.

One thing's for sure, the arrival of Veo and Imagen 3 marks an exciting step towards a future of more accessible and efficient video creation.

How to Install Gemini AI Extension on GNOME Desktop


 Want to engage with advanced artificial intelligence (AI) directly from your GNOME desktop? Meet Gemini, Google's answer to ChatGPT, and even more!

While Gemini has the potential to replace Google Assistant on your Android phone in the future, your AI satisfaction isn't limited to mobile devices. You can also access Gemini through your web browser at gemini.google.com. Not enough? You can bring it to your GNOME desktop with a handy extension and an API key.

Once installed, you can simply click the icon in the top bar, ask Gemini a question, and its response will appear in a dropdown. While Gemini can also generate images, the extension doesn't fully support this feature yet (images will appear as rows of black lines). Nonetheless, it remains a very convenient way to access the Gemini AI service.

Let's see how to add it to your GNOME desktop environment!

Installing the Gemini Extension

Prerequisites:

  • Linux distribution with GNOME desktop environment
  • Firefox web browser
  • Free API key from Google AI Studio

Steps:

  1. Open Firefox and Locate the Extension:

    Open your Firefox browser and navigate to the Gemini GNOME extension page.

  2. Install the Extension:

    On the "Gemini AI ChatBot" extension page, click "Install" and confirm with "OK" when prompted (you may also need to enter your Linux user password).

    Note: Installing the "Gemini AI ChatBot" extension requires the Firefox browser.

  3. Generate an API Key:

    The next step is to obtain an API key from Google AI Studio. Open the Google AI Studio page in your browser. Click "Get API key" at the top of the left sidebar. On the resulting page, click "Create API Key" near the middle.

    Tips:

    • When prompted, select "Generative Language Client" from the Google Cloud Projects dropdown menu, and then click "Create API Key" in the "Existing Project" section.

    Important:

    • Make sure you choose the correct entry from the dropdown menu.
  4. Add Your API Key:

    Click the Gemini extension icon in the top bar, then click the "Gear" (Settings) icon to access the pop-up settings window. In the pop-up window, paste your key into the "Gemini API Key" field. Once done, click "Save".

    Optional:

    You can also choose to "Remember talk history" which will save your conversations between login sessions.

  5. Use the Gemini Extension:

    Once everything is set up, click the Gemini icon and type your question.

    Gemini will respond to your query in a pop-up window. Your chat history will be preserved until you log out of GNOME.

Enjoy Conversational AI on Your GNOME Desktop

With the Gemini GNOME extension, you can have engaging and informative conversations with an advanced AI right from your GNOME desktop. Ask it questions, seek its insights, and explore the possibilities of AI-powered interaction. Remember to replace the placeholder text with your actual API key when setting up the extension.